How to Use Acrylic Frame Screws to Join Two Acrylic Sheets
Share
How to Use Acrylic Frame Screws to Create Stunning Floating Acrylic Frames
Looking for a clean, modern way to display photos, artwork, or important documents? Acrylic frame screws offer a simple and professional solution. With just a few clear polycarbonate screws, some laser cutting, and a little creativity, you can build your own custom floating acrylic frame that looks like it came straight out of a design studio.
In this guide, we’ll walk you through the process, show off some fun project ideas, and share tips for getting the best results using our Acrylic Frame Screws.
What Are Acrylic Frame Screws?
Our clear acrylic frame screws come in two parts: a threaded screw and a threaded post. They’re made from durable, optically clear polycarbonate and are designed specifically for mounting two sheets of acrylic together — with something sandwiched between them, like a photo, sticker, or printed graphic.
Important Note: These screws are not meant to press two sheets directly together with no space in between. If there’s no content between the acrylic layers, the screws won’t tighten down all the way — you’ll notice some “play” or looseness. To avoid this, use a backing (like cardstock or photo paper) to create a snug fit.
Project Example #1: Personalized Mountain Photo Frame
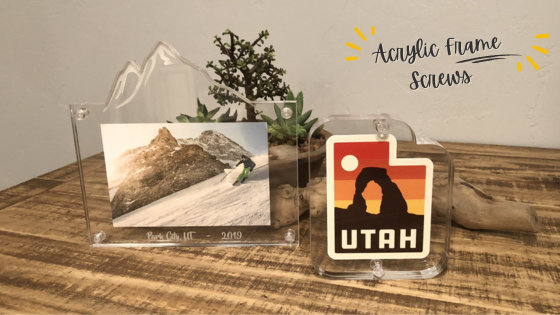
One of our favorite floating frame projects features a snapshot from the ski slopes of Salt Lake City, UT. Here's how we brought it to life:
Materials:
- Two laser-cut acrylic sheets
- A printed photo (from Costco, taken on an iPhone)
- Acrylic Frame Screws
- Custom laser engraving and profile cut design
Steps:
- Design & Print: Start with a photo and a graphic design layout that fits your frame size.
- Laser Cut Profile Shapes: We used a custom mountain range profile for both sheets of acrylic.
- Add Depth with Engraving: Only the back sheet had the engraving, while the front was left clear. This gives the illusion of depth and a layered look.
- Engrave Details: We reverse-engraved “Park City, UT - 2019” with a fun, themed font into the top layer.
- Drill Mounting Holes: Use a .240" diameter drill bit (or laser cut the holes) — one in each corner.
- Assemble: Align your artwork between the two sheets, insert the screws, and tighten by hand.
The result? A clean, modern floating frame with both photo and ornamental engraving, ready to hang or display.

Project Example #2: Acrylic Sticker Display
Another popular design in our office features a simple but eye-catching Utah-shaped sticker.
Materials:
- 1/2" Clear Acrylic Sheet
- Profile cut based on the sticker shape
- Acrylic Frame Screws (top and bottom mount)
Steps:
- Trace the Sticker Shape: Use a profile/contour cut that matches the sticker.
- Add Screw Holes: Just two are needed — centered at the top and bottom.
- Apply the Sticker: Mount the sticker between the two layers, and secure with the screws.
Simple and striking! The sticker’s vibrant colors shine through the crystal-clear acrylic.

🎨 Ideas for Custom Floating Acrylic Displays
With just a few supplies and a bit of imagination, you can create a wide range of acrylic floating frames. Some ideas to get you started:
- Family vacation photos
- Event or parking permits
- Business licenses or awards
- Mini art prints
- Special stickers or collectible items
Laser engraving adds a personal touch — from dates and names to logos and decorative flourishes. Mix and match materials, colors, and thicknesses to suit your style.
Final Thoughts
Whether you're preserving memories or making unique gifts, Acrylic Frame Screws make DIY framing simple, secure, and sleek. With just a few cuts and a little customization, your display will look polished and professional — no glue or complicated hardware needed.
Ready to get started? Shop Acrylic Frame Screws here ➜
